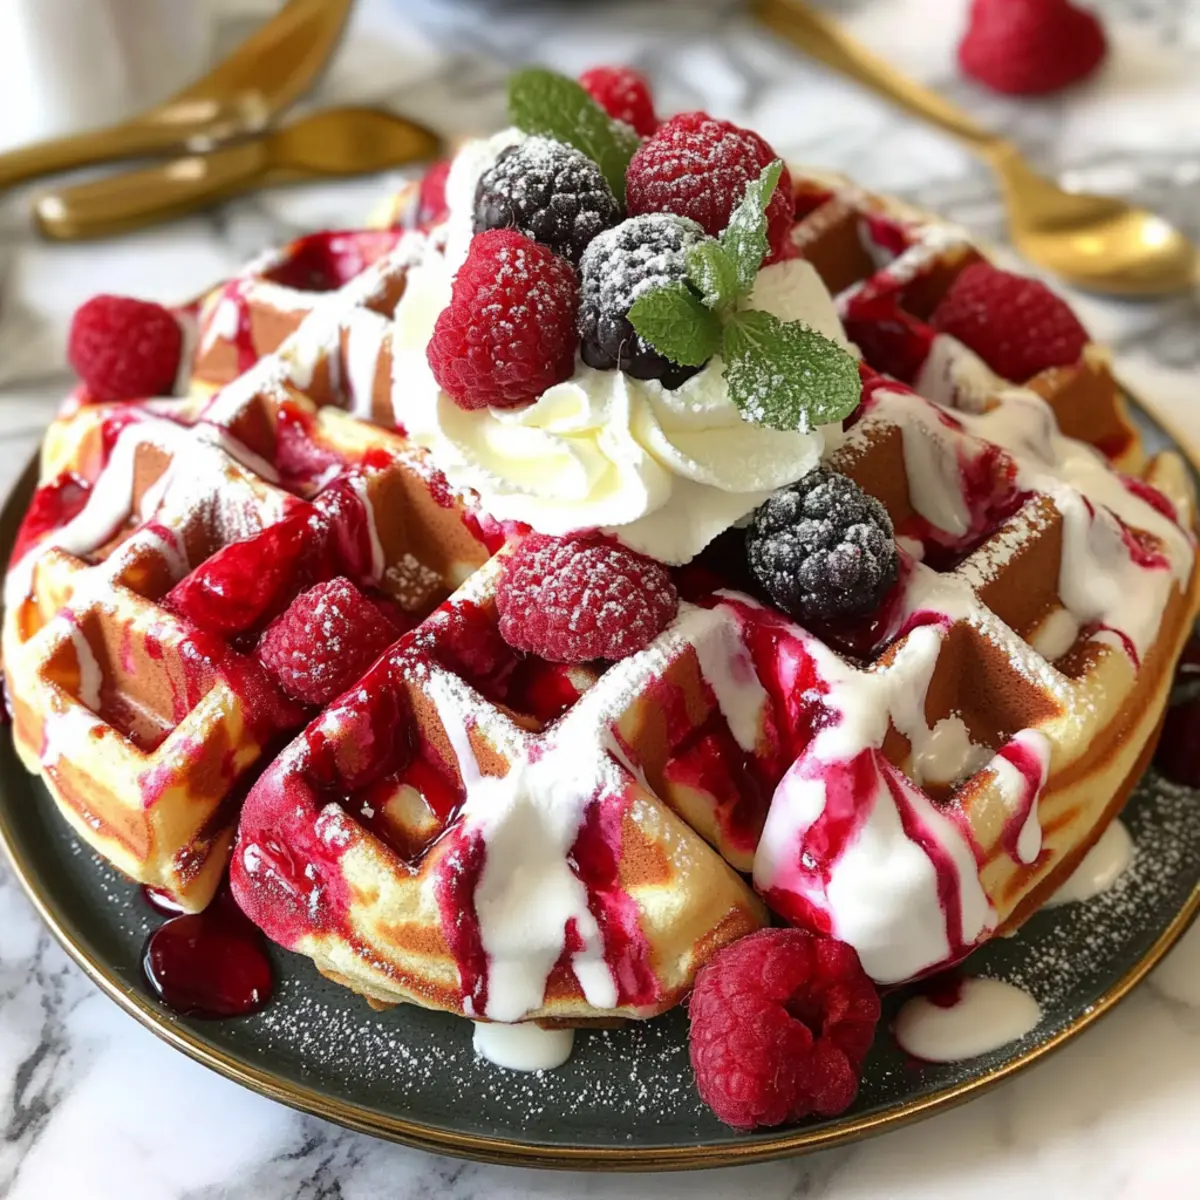
As the aroma of baked goodies wafts through my kitchen, I can’t help but smile at the whimsical charm of Fluffy Red Velvet Marble Waffles. These delightful breakfast treats feature a gorgeous marbled design, combining the richness of red velvet with the classic waffle taste. Perfect for special occasions or a cozy brunch, they’re not just visually stunning—they also bring together the best of both flavors in a light and fluffy format. And if red velvet isn’t your thing, worry not! You can easily swap in your favorite flavors without sacrificing that delightful texture. What toppings will you drizzle over your first batch?

Why Are These Waffles So Special?
Whimsical Flavors: The blend of rich red velvet and classic waffle batter results in a unique, scrumptious treat that’s sure to brighten your mornings.
Easy to Customize: Not a fan of red velvet? Switch it out for your preferred flavors while still enjoying that delightful light texture.
Festive Presentation: The stunning marbled effect makes these waffles not just a meal but also a visual centerpiece, perfect for impressing brunch guests.
Quick Prep: With simple ingredients and straightforward steps, you can whip up these beauties without fuss. Try pairing them with fresh fruits or a drizzle of maple syrup for the ultimate experience. For more delicious ideas, check out our Chicken Alfredo Tater or Chicken Alfredo Lasagna recipes!
Crowd-Pleaser: These waffles are bound to be a hit at any gathering, transforming ordinary breakfasts into festive celebrations.
Red Velvet Marble Waffles Ingredients
• Unleash your kitchen creativity with these enchanting ingredients!
For the Classic Batter
- All-Purpose Flour – Provides structure; substitute with gluten-free flour if desired.
- Sugar – Adds sweetness; coconut sugar can lend a healthier twist.
- Baking Powder – Serve as a leavening agent to ensure fluffiness.
- Baking Soda – Enhances rise in the batter; don’t skip this essential!
- Salt – Enhances flavor; just a pinch elevates your waffles!
- Buttermilk – Brings moisture and tang; use milk + vinegar as a quick substitute.
- Eggs – Acts as a binding agent; swap with a flax egg for a vegan option.
- Melted Butter – Adds richness; feel free to use coconut oil instead.
- Vanilla Extract – Infuses flavor; pure extract provides the best taste.
For the Red Velvet Batter
- Cocoa Powder – Delivers that classic red velvet taste and color; can be omitted for a classic version.
- Red Food Coloring – Gives the signature red hue; omit for a more traditional look.
These Red Velvet Marble Waffles are not just delicious; they’re your ticket to a festive brunch that beckons to be shared and savored!
Step‑by‑Step Instructions for Red Velvet Marble Waffles
Step 1: Prepare Classic Waffle Batter
In a large mixing bowl, whisk together 1 ½ cups of all-purpose flour, 2 tablespoons of sugar, 2 teaspoons of baking powder, ½ teaspoon of baking soda, and ½ teaspoon of salt. In another bowl, combine 1 cup of buttermilk, 2 large eggs, 4 tablespoons of melted butter, and 1 teaspoon of vanilla extract. Gently mix the dry and wet ingredients until just combined, ensuring not to overmix for fluffy Red Velvet Marble Waffles.
Step 2: Prepare Red Velvet Batter
In a separate bowl, whisk together 1 cup of all-purpose flour, ¼ cup of cocoa powder, ½ cup of sugar, 2 teaspoons of baking powder, ½ teaspoon of baking soda, and ½ teaspoon of salt. In another bowl, blend 1 cup of buttermilk, 1 large egg, 4 tablespoons of melted butter, 1 teaspoon of vanilla extract, and 2 tablespoons of red food coloring. Carefully mix the wet and dry ingredients until just incorporated, creating the rich, vibrant red velvet batter.
Step 3: Preheat Waffle Iron
While preparing the batters, preheat your waffle iron according to the manufacturer’s instructions. Ensure the iron is hot and ready to create beautifully crisp and fluffy waffles. If your waffle iron requires greasing, lightly brush it with oil or melted butter to prevent sticking while cooking the Red Velvet Marble Waffles.
Step 4: Create Marble Effect
Once both batters are prepared and your waffle iron is hot, lightly grease the iron. Spoon a small amount of classic waffle batter into the center, followed by a dollop of red velvet batter. Use a toothpick or knife to gently swirl the batters together, creating a marbled pattern without fully mixing them. This step is key to achieving the stunning look of your Red Velvet Marble Waffles.
Step 5: Cook the Waffles
Close the waffle iron and cook according to the manufacturer’s instructions, usually about 4-6 minutes, or until the waffles are golden brown and crisp. If your appliance has an indicator light, wait until it signals that the waffles are ready. Carefully remove the waffles and set them aside, keeping them warm on a plate while you repeat the process with the remaining batter.
Step 6: Serve Warm
Once all the waffles are cooked, serve your delightful Red Velvet Marble Waffles warm. Top them with whipped cream, fresh berries, or a generous drizzle of maple syrup to enhance their festive charm. Gather around the table, and let everyone dive into these beautifully marbled breakfast treats for a special morning feast!

Expert Tips for Red Velvet Marble Waffles
- Mix Gently: Avoid overmixing both batters to keep the waffles light and fluffy. Just mix until combined for perfect Red Velvet Marble Waffles.
- Temperature Matters: Preheat your waffle iron thoroughly. If it’s not hot enough, your waffles might turn out soggy instead of crisp.
- Swirl Carefully: When creating the marble effect, be gentle with the toothpick. Too much swirling will mix the batters instead of creating a beautiful marbled design.
- Toppings Galore: Experiment with toppings! Fresh berries, whipped cream, or a drizzle of honey can elevate your waffles to a new level of deliciousness.
- Storing Leftovers: If you have any leftovers (which is unlikely!), keep them in an airtight container in the fridge for up to 2 days. Reheat in the toaster for that crisp texture!
Red Velvet Marble Waffles Variations
Customize your delightful waffles to match your taste and cravings!
- Classic Waffle Base: Skip the red velvet batter and stick with just the classic waffle recipe for a simpler option.
- Matcha Twist: Swap out red velvet for matcha powder to create a vibrant green marble effect—perfect for a unique brunch!
- Chocolate Chip Addict: Fold in a handful of chocolate chips into either batter for added sweetness and texture bursts in every bite.
- Coconut Flavor Boost: Replace half of the buttermilk with coconut milk for a tropical twist that adds a subtle sweetness and richness.
- Nutty Delight: Stir in chopped nuts like pecans or walnuts to enhance the crunch factor and add heartiness.
- Seasonal Flavors: Celebrate the seasons by adding a few drops of pumpkin spice or cinnamon to the classic batter for a cozy flavor, especially in fall.
- Mini Waffles: Use a mini waffle iron for snack-sized portions that are great for kids and parties—just adjust cooking time accordingly.
- Vegan Version: Replace eggs with a flax egg and use almond milk in place of buttermilk to make this recipe vegan-friendly while keeping that enchanting texture.
Don’t forget to explore options like pairing these waffles with a drizzle of chocolate sauce or homemade whipped cream. Feeling adventurous? Check out our delicious Chicken Alfredo Tater or experience the flavors of a cozy brunch with Chicken Alfredo Lasagna for more delightful meals!
Storage Tips for Red Velvet Marble Waffles
- Room Temperature: Allow waffles to cool completely before storing. They can be kept at room temperature for up to 2 hours, covered to prevent drying out.
- Fridge: Store leftovers in an airtight container for up to 2 days. This helps maintain moisture while keeping the waffles fresh and delicious.
- Freezer: For longer storage, freeze the waffles in a single layer on a baking sheet. Once frozen, transfer them to a zip-top bag, where they can be stored for up to 3 months.
- Reheating: To enjoy that light and fluffy texture again, reheat frozen Red Velvet Marble Waffles in a toaster or preheated oven for a few minutes until warmed through and crispy.
Make Ahead Options
These Red Velvet Marble Waffles are a fantastic choice for meal prep! You can prepare the waffle batters up to 24 hours ahead of time. Simply mix the classic and red velvet batters separately, then store them in airtight containers in the refrigerator. When you’re ready to serve, just give the batters a gentle stir and proceed with cooking them in your preheated waffle iron. This not only saves you time on busy mornings but also ensures that your waffles are just as fluffy and delicious as if you made them from scratch that day. Enjoy the convenience of having a delightful breakfast ready with minimal effort!
What to Serve with Red Velvet Marble Waffles
As you prepare to delight in the whimsical flavors of your waffles, consider these delectable pairings to create the perfect festive brunch experience.
-
Whipped Cream:
The light, airy texture of whipped cream complements the soft waffles, providing a delightful contrast that enhances the sweetness. -
Fresh Berries:
Juicy strawberries, blueberries, or raspberries add a burst of freshness and a pop of color, balancing the richness of the red velvet flavor. -
Maple Syrup:
A drizzle of warm maple syrup introduces a rich sweetness, tying all the flavors together for a truly indulgent treat. -
Coconut Flakes:
Toasted coconut flakes bring a subtle crunch and tropical flair to every bite, offering a unique twist on this classic breakfast dish. -
Chocolate Sauce:
For chocolate lovers, a rich drizzle of chocolate sauce amplifies the red velvet experience, creating an irresistible dessert-like vibe. -
Nut Butter:
Creamy almond or peanut butter spreads provide a nutty richness that complements waffles beautifully, making each mouthful satisfying and heartwarming.

Red Velvet Marble Waffles Recipe FAQs
How do I choose the right level of ripeness for the ingredients?
Absolutely! When selecting ingredients like eggs, opt for ones that have a firm shell and are within their sell-by date for freshness. For buttermilk, it should be creamy and without lumps. If you’re using fresh berries for toppings, look for ones that are vibrant in color, free from visible mold, and plump.
What is the best way to store leftover Red Velvet Marble Waffles?
Leftover waffles can be stored in an airtight container in the refrigerator for up to 2 days. To maintain their texture, ensure they cool completely before placing them in the container. Reheating them in a toaster or preheated oven will make them crispy again, so they taste just as good as when freshly made!
Can I freeze my waffles, and how do I do that?
Definitely! To freeze your Red Velvet Marble Waffles, allow them to cool completely first. Then, place them in a single layer on a baking sheet and freeze them until firm—this usually takes about 1 to 2 hours. After they’re frozen, transfer them to a zip-top freezer bag. They can be stored for up to 3 months. When you’re ready to eat, pop them in the toaster or a preheated oven to reclaim their fluffy texture!
What should I do if my waffles stick to the iron?
Very good question! If your waffles are sticking, it may be due to not greasing the waffle iron enough before pouring in the batter. Use a light spray of non-stick cooking oil or brush melted butter on the plates before adding the batter. Additionally, make sure not to open the waffle iron prematurely; waiting until they are golden brown will help them release more easily.
Are there any common allergens in the ingredients list?
Yes, while delicious, there are a few common allergens in these Red Velvet Marble Waffles. They contain gluten from the all-purpose flour, dairy from buttermilk and butter, and eggs. If you have dietary restrictions, there are substitutes you can use—like gluten-free flour, almond milk combined with vinegar (to mimic buttermilk), or using a flax egg instead of regular eggs for a vegan option. Always check labels for possible cross-contamination if allergies are a concern.

Whimsical Red Velvet Marble Waffles for a Festive Brunch
Ingredients
Equipment
Method
- In a large mixing bowl, whisk together 1 ½ cups of all-purpose flour, 2 tablespoons of sugar, 2 teaspoons of baking powder, ½ teaspoon of baking soda, and ½ teaspoon of salt.
- In another bowl, combine 1 cup of buttermilk, 2 large eggs, 4 tablespoons of melted butter, and 1 teaspoon of vanilla extract. Gently mix the dry and wet ingredients until just combined.
- In a separate bowl, whisk together 1 cup of all-purpose flour, ¼ cup of cocoa powder, ½ cup of sugar, 2 teaspoons of baking powder, ½ teaspoon of baking soda, and ½ teaspoon of salt.
- In another bowl, blend 1 cup of buttermilk, 1 large egg, 4 tablespoons of melted butter, 1 teaspoon of vanilla extract, and 2 tablespoons of red food coloring.
- Preheat your waffle iron according to the manufacturer's instructions, lightly greasing it if necessary.
- Spoon a small amount of classic waffle batter into the center, followed by a dollop of red velvet batter. Use a toothpick or knife to swirl the batters together.
- Close the waffle iron and cook for about 4-6 minutes, until the waffles are golden brown and crisp.
- Once all the waffles are cooked, serve them warm with whipped cream, fresh berries, or a drizzle of maple syrup.

Leave a Reply