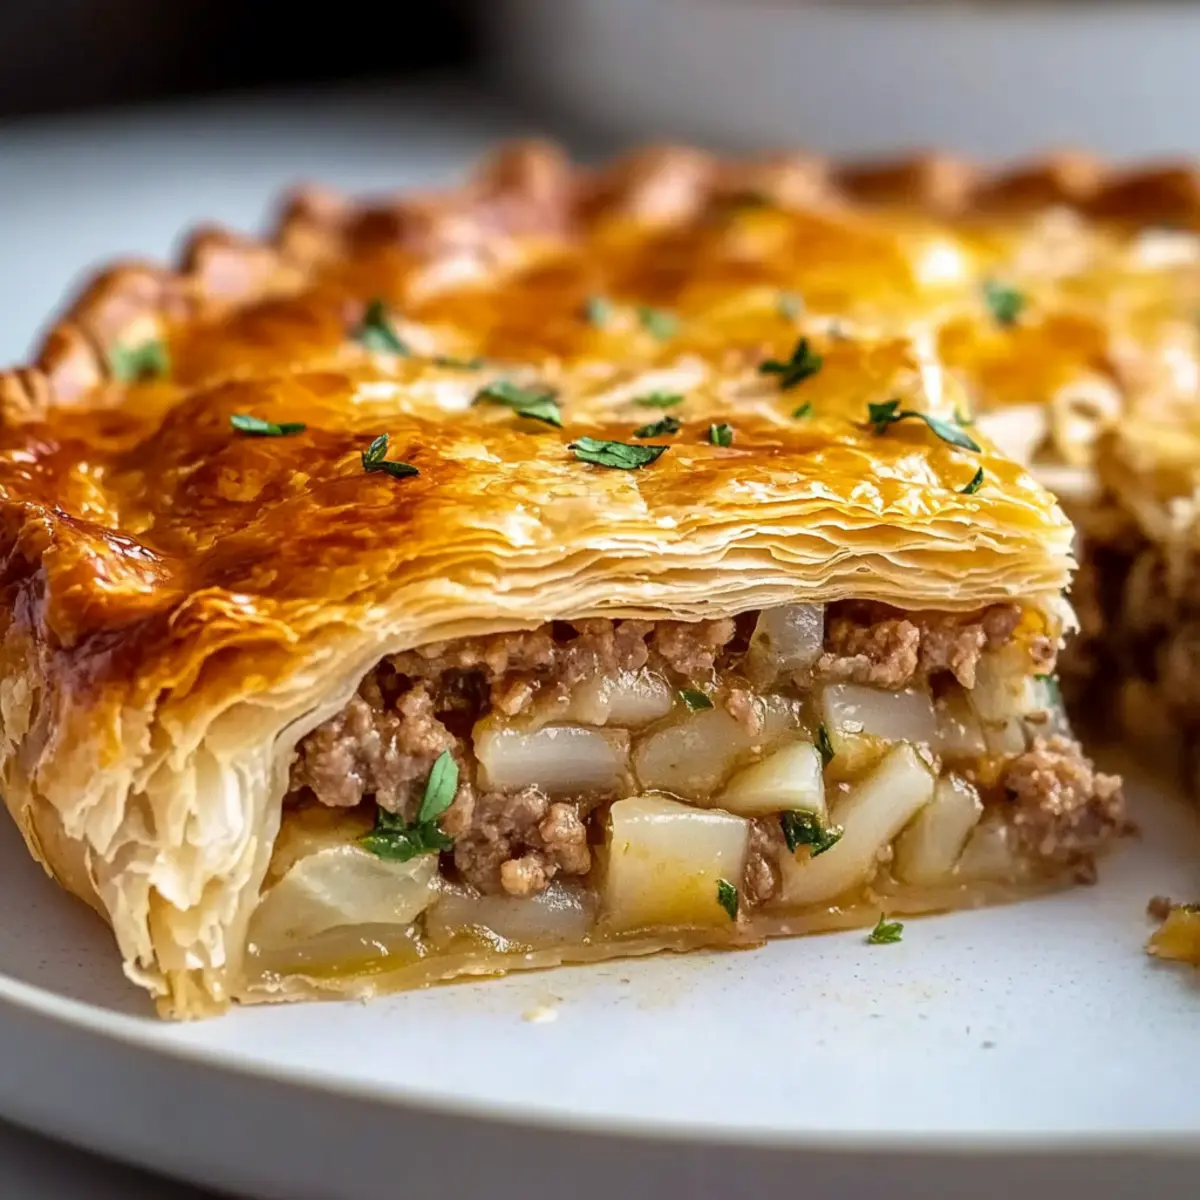
As I flipped through my grandmother’s cherished recipe book, I was immediately drawn to the vibrant aroma of her Kreatopita, the classic Greek meat pie that filled her kitchen with warmth. Each golden, flaky layer of phyllo wraps a savory filling of well-seasoned ground beef and rice, creating a dish that’s both hearty and utterly comforting. Perfect for an easy weeknight dinner or an impressive spread for guests, this Kreatopita sends everyone to the table. It’s a delightful way to escape the fast-food rut and embrace home-cooked goodness, blending rich flavors and satisfying textures in a joyful embrace of Greek tradition. Are you ready to rediscover the pleasure of homemade meals? Let’s dive into crafting this flavorful pie together!

Why is Kreatopita so beloved?
Cozy Comfort: This Kreatopita serves up hearty warmth that provides a delightful escape from everyday meals. Each cut reveals layers of flaky phyllo, creating a satisfying contrast to the rich, savory filling within.
Simple Ingredients: Using common pantry staples, this recipe is both accessible and adaptable, making it an ideal choice for spontaneous cooking.
Crowd-Pleaser: Perfect for gatherings, its tempting aroma and inviting presentation guarantee that it will charm your guests, whether it’s a dinner party or a family meal.
Versatile Options: Want a twist? Simply swap ground beef with lentils for a vegetarian delight, or experiment with spices for customized flavor profiles.
Quick Prep Time: Despite its impressive look, you can whip this up in under an hour, freeing you to spend quality time with loved ones.
So, gather your ingredients and share the love of homemade food with this soul-satisfying Greek dish!
Kreatopita Ingredients
For the Filling
• Ground Beef – Provides the main protein and rich flavor; you can substitute with ground lamb or pork for variation.
• Onion – Adds sweetness and depth; finely chop for an even distribution in the filling.
• Rice – Binds the filling and gives it texture; consider substituting with brown rice or quinoa (par-cook if using brown rice).
• Tomato Sauce – Adds moisture and acidity for balanced flavor; you can use homemade or store-bought.
• Oregano – A key herb for authentic Greek flavor; both dried and fresh are acceptable.
• Salt & Pepper – Essential for seasoning; adjust according to your taste preferences.
For the Phyllo Crust
• Phyllo Dough – Delivers that unforgettable flaky texture; keep covered with a damp towel to prevent drying out.
• Butter or Oil – Used for brushing phyllo layers to create a crispy, golden finish; melted butter adds a rich flavor.
With this array of simple yet essential ingredients, you’ll be well on your way to creating a delicious Kreatopita that’s sure to impress!
Step‑by‑Step Instructions for Kreatopita
Step 1: Preheat the Oven
Begin by preheating your oven to 180°C (350°F). This ensures that your Kreatopita bakes evenly and develops a beautifully golden crust. While you wait, gather your ingredients to keep everything organized and ready for the next steps in preparing this delightful Greek meat pie.
Step 2: Sauté the Onion
In a large skillet, heat a splash of oil over medium heat. Add the finely chopped onion and sauté until it becomes soft and translucent, about 5 minutes. This process enhances the sweetness of the onion, creating a solid flavor base for the filling of your Kreatopita. Be sure to stir occasionally to prevent sticking.
Step 3: Brown the Beef
Next, add the ground beef to the skillet with the sautéed onions. Cook, breaking it apart with a wooden spoon, until it’s fully browned with no pink remaining, approximately 7-10 minutes. This step is crucial for achieving rich flavors in your filling, so let it sizzle and develop a nice color.
Step 4: Combine the Filling Ingredients
Once the beef is browned, incorporate the uncooked rice, tomato sauce, oregano, salt, pepper, and a splash of water. Mix everything well and let it simmer for about 10 minutes on low heat. The rice will begin to absorb moisture, and the flavors will meld deliciously as the mixture thickens slightly.
Step 5: Prepare the Phyllo Layers
While the filling simmers, prepare your baking dish by brushing a light layer of melted butter or oil on the bottom. Then, layer five sheets of phyllo dough in the dish, pressing them gently to fit. Brush each sheet with melted butter or oil before adding the next one, ensuring a crispy texture for your Kreatopita.
Step 6: Add the Filling
Carefully spoon the beef and rice mixture evenly over the layered phyllo in your baking dish. Spread it into a flat, even layer, making sure the filling reaches all corners. This will create a hearty and satisfying base for your Kreatopita, ready to be topped with more phyllo.
Step 7: Top with Phyllo Layers
Repeat the layering process with another five sheets of phyllo dough on top of the filling. Again, brush each layer with melted butter or oil, and once finished, tuck in the edges of the phyllo to seal in the filling. This additional layer will create that signature flaky top crust of the Kreatopita.
Step 8: Bake the Kreatopita
Transfer the baking dish to your preheated oven and bake for 40 to 45 minutes. You’ll know it’s done when the top is golden brown and crispy, emitting a delightful aroma that will fill your kitchen. The phyllo crust should look perfect, providing a stunning visual presentation for your dish.
Step 9: Let it Rest and Serve
Once baked, remove the Kreatopita from the oven and let it rest for about 10 minutes. This resting time allows the filling to set slightly, making it easier to slice. After resting, cut it into portions and serve warm, enjoying the comforting flavors and textures that make this dish a family favorite.

How to Store and Freeze Kreatopita
Fridge: Store any leftover Kreatopita in an airtight container in the fridge for up to 3 days. This helps maintain its delightful texture and flavors.
Freezer: To freeze, wrap individual portions in plastic wrap followed by aluminum foil, ensuring no air pockets for optimal preservation. It can last up to 2 months in the freezer.
Reheating: To reheat, bake from frozen at 180°C (350°F) for about 25-30 minutes until heated through and the crust is crispy again. Enjoy a slice of homemade goodness!
Expert Tips for Kreatopita
-
Temperature Matters: Make sure your oven is fully preheated to achieve that perfect, flaky crust on your Kreatopita. An under-heated oven can lead to soggy phyllo.
-
Handle Phyllo Gently: Phyllo dough is delicate; avoid tearing by working slowly. Keep it covered with a damp towel while assembling to prevent it from drying out.
-
Don’t Overcook the Beef: Remove the ground beef from the heat as soon as it’s browned to prevent it from drying out. Remember that it will continue to cook in the oven.
-
Layering Technique: When layering phyllo, brush each sheet lightly with butter or oil. This is crucial to ensure all layers become crisp and flaky, contributing to the delightful texture of your Kreatopita.
-
Let It Rest: After baking, let your Kreatopita rest for 10 minutes before slicing. This allows the filling to firm up, making it easier to cut clean portions.
-
Customize Your Filling: Feel free to tweak the flavors by adding spices like cumin or a hint of cinnamon for a unique twist. The filling is versatile, so have fun with it!
Kreatopita: Flavorful Twists Await!
Feel free to explore this recipe’s delightful flexibility, transforming your Kreatopita into something uniquely yours!
-
Vegetarian Delight: Use lentils or mushrooms instead of meat for a hearty, plant-based option that’s just as satisfying. This variation keeps the comforting essence while catering to dietary preferences.
-
Spice it Up: Add cumin or cinnamon to the filling for an unexpected flavor boost that warms the palate and transports you to the Mediterranean.
-
Cheesy Indulgence: Mix in crumbled feta with the filling for a creamy, tangy twist that elevates each bite, marrying beautifully with the savory meat or veggie base.
-
Texture Play: Consider layering the filling with spinach or other greens for added texture and nutrients. This brings a vibrant color and fresh taste to the traditional recipe.
-
Different Shapes: Use muffin tins for mini Kreatopita or bake in a round dish for triangle servings. This fun presentation makes them perfect for parties or kid-friendly meals.
-
Herb Bliss: Infuse more flavor by adding fresh parsley or dill to the filling. The fresh herbs brighten up the dish and complement the earthy flavors beautifully.
-
Heat Lover’s Choice: For those who like it spicy, incorporate chili flakes or a dash of hot sauce into the filling to bring a kick, making every forkful exciting.
Each variation is a step toward making this dish a personal favorite! Pair your Kreatopita with a refreshing Greek salad or some homemade tzatziki for a true Mediterranean experience. Enjoy the journey of flavors!
What to Serve with Kreatopita
Whether you’re gathering with family around the dinner table or hosting friends for a special night, these delightful side dishes will elevate your Kreatopita experience.
-
Greek Salad: Crisp cucumbers, juicy tomatoes, and tangy feta create a refreshing contrast to the hearty meat pie. A drizzle of olive oil brings everything together beautifully.
-
Tzatziki Sauce: This cool, creamy yogurt dip adds a refreshing twist, perfect for slathering on each bite of the warm, flaky pie. It’s a classic taste of Greece that complements the rich filling.
-
Roasted Vegetables: Roasted seasonal veggies bring a pop of color and sweetness, balancing the savory flavors of the Kreatopita. Try carrots, bell peppers, and zucchini drizzled with herbs.
-
Lemon Rice: Fluffy rice with a hint of citrus enhances the overall meal with a light and zesty element that pairs harmoniously with the robust flavors of the meat pie.
-
Warm Pita Bread: Fluffy and warm, pita serves as a delightful vessel for scooping up slices of the Kreatopita, making it easy to enjoy every last bite.
-
Red Wine: A glass of bold red wine, such as a Merlot or Cabernet Sauvignon, complements the heartiness of the pie, creating a lovely dining experience.
-
Baklava: For dessert, this sweet, flaky treat rich with honey and nuts serves as the perfect sweet finish to your Greek-inspired meal, leaving everyone with a smile.
Make Ahead Options
These Kreatopita are perfect for busy home cooks looking to save time! You can prepare the filling (ground beef, rice, and seasonings) up to 24 hours in advance; simply let it cool and refrigerate in an airtight container. The phyllo can also be layered in the baking dish, covered tightly with plastic wrap, and stored in the fridge for up to 2 days. When you’re ready to bake, simply add the filling to the phyllo base, top with additional layers, and then bake it directly from the refrigerator. This way, you’ll enjoy the same delicious, flaky layers and hearty filling, all while freeing up your evening for your loved ones!

Kreatopita: Classic Greek Meat Pie Recipe FAQs
How do I choose the best ingredients for my Kreatopita?
Absolutely! When selecting ground beef, look for a lean cut to ensure the filling is not too greasy; about 80/20 lean-to-fat ratio is perfect. For phyllo dough, check that it’s fresh and stored in the refrigerated section. When picking tomatoes for the sauce, look for bright red tomatoes with a slight give to the touch, indicating ripeness.
What is the best way to store leftover Kreatopita?
Very good question! You can refrigerate leftover Kreatopita in an airtight container for up to 3 days. For optimal freshness, allow it to cool completely before sealing it. This will help retain its flaky texture and savory flavors, making it a delightful treat for later.
Can I freeze Kreatopita, and how should I do it?
Yes, absolutely! To freeze your Kreatopita, first slice it into portions for easier reheating later. Wrap each piece in plastic wrap, ensuring it’s tightly sealed to prevent freezer burn. Next, place those in a sturdy container or a freezer bag. It will keep well for up to 2 months. When you’re ready to enjoy, simply bake it from frozen at 180°C (350°F) for about 25-30 minutes until warm and crispy.
What should I do if my phyllo dough tears while assembling?
Don’t worry; it happens to the best of us! If your phyllo tears, simply patch it up with an extra piece or fold it over the torn area. Since phyllo is quite forgiving, as long as each layer is brushed with butter, it’ll still bake up beautifully! Just be mindful to handle the dough gently and keep it covered with a damp cloth to maintain its moisture.
Can I make a vegetarian version of Kreatopita?
Certainly! For a lush vegetarian option, replace the ground beef with a mix of cooked lentils or sautéed mushrooms. You can also add finely chopped vegetables such as spinach or zucchini for extra flavor and nutrition. Follow the same cooking instructions, and you’ll be surprised by how delightful and hearty the veggie version can be!

Kreatopita: Irresistibly Cozy Greek Meat Pie Recipe
Ingredients
Equipment
Method
- Preheat your oven to 180°C (350°F).
- Sauté the finely chopped onion in a large skillet with oil over medium heat until soft and translucent, about 5 minutes.
- Add the ground beef and cook until browned, around 7-10 minutes, breaking it apart with a wooden spoon.
- Combine uncooked rice, tomato sauce, oregano, salt, pepper, and a splash of water in the skillet. Let it simmer for about 10 minutes.
- Brush a baking dish with melted butter or oil, and layer five sheets of phyllo dough, pressing gently and brushing each with more butter or oil.
- Spoon the beef and rice mixture evenly over the phyllo in the baking dish.
- Layer another five sheets of phyllo on top of the filling, brushing each layer with melted butter or oil.
- Bake for 40 to 45 minutes until the top is golden brown and crispy.
- Let the Kreatopita rest for about 10 minutes before slicing and serving warm.

Leave a Reply